Building Terminal Apps with Flutter
In a nutshell
Building custom apps for Terminal with Flutter? In this guide, we’ll explore how to use Flutter’s Method Channel to interact with the Paystack app to accept payment.
Introduction
Before you begin
You should create a free Paystack account which will give you access to your unique test key to test your integration.
Paystack Terminal allows you to build custom apps that communicates via intent with the Terminal app to accept payments. The Terminal app handles everything about payment, allowing you to focus on building your apps. At the point of payment, you simply pass the payment details to the Terminal app via intents, the payment is processed and a response is passed back to your app.
Project setup
Getting started
This guide assumes you have an existing Flutter app, hence, our focus is on building the payment flow.
We’ll be using Flutter’s Method Channel to allow a communication between Dart and Kotlin. This guide was guide using the following setup:
- Android Studio
- VSCode
- Flutter (3.13.9)
- Dart (3.1.5)
While, it’s not compulsory to use all as-is, it would make it easier to follow along with little to no errors. Android Studio is particularly used to write and mange all Kotlin code.
Create models
To get started, we’ll be creating all the models we need for the payment flow. Before creating our models, we need to install Gson, a library for serialising and deserialising Java/Kotlin objects.
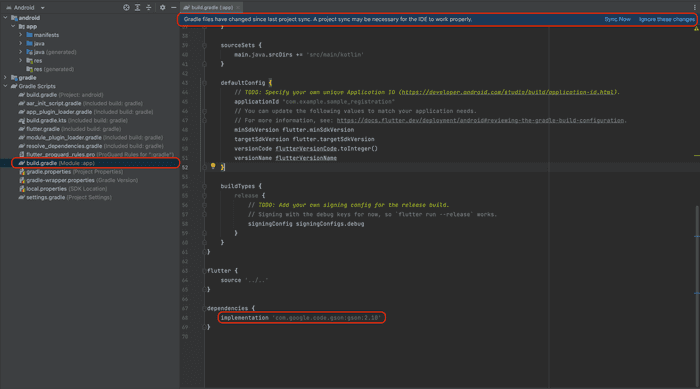
To install Gson, open the android folder in your project in Android Studio. Once opened:
- Ensure your Android Studio workspace is configured to
Android. - Open the app
build.gradle. This is the one that has aModule: YourAppName.app. - Add
gsonas a dependency. - A popup shows up to
Sync Now. Syncing installs the dependency and makes it available in your project for usage.

With our dependency installed, we can create the following models:
- TerminalResponse
- PaystackIntentResponse
- TransactionRequest
- TransactionResponse
1// TerminalResponse.kt2data class TerminalResponse(3 val statusCode: String,4 val message: String,5 val data: String6)
Create payment intent
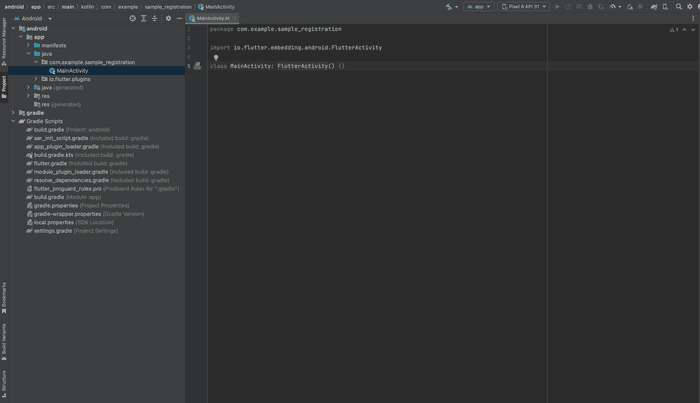
With our models in place, we can now create the method to initiate payment, pass it to the Paystack app and process the result. To do this, we need to open the MainActivity.kt file. You can locate this file in the android → app → java → YourPackageName of your app:

Initially, the file contains an empty class. We’ll add the methods to initiate payment and process the response:
- MainActivity.kt
1// MainActivity.kt2import android.content.Intent3import android.util.Log4import android.widget.Toast5import com.example.sample_registration.model.CustomField6import com.example.sample_registration.model.PaystackIntentResponse7import com.example.sample_registration.model.TerminalResponse8import com.example.sample_registration.model.TransactionRequest9import com.example.sample_registration.model.TransactionResponse10import com.google.gson.Gson11import io.flutter.embedding.android.FlutterActivity1213class MainActivity: FlutterActivity() {14 private val gson = Gson()15 private var transactionStatus: String? = ""1617 private val CHANNEL = "com.example.sample_registration/payment"18 private val PACKAGE_NAME = "com.paystack.pos"19 private val TRANSACTION = "com.paystack.pos.TRANSACT"20 private val TRANSACTION_RESULT_CODE = 14212223 private fun makePayment(amount: Int?) {24 val transactionRequest = amount?.let {25 TransactionRequest(26 amount = it,27 offlineReference = null,28 supplementaryReceiptData = null,29 metadata = mapOf(30 "custom_fields" to listOf(31 CustomField(32 displayName = "App Name",33 variableName = "app_name",34 value = "Sample Registration"35 )36 )37 )38 )39 }4041 val transactionIntent = Intent(Intent.ACTION_VIEW).apply {42 setPackage(PACKAGE_NAME)43 putExtra(TRANSACTION, gson.toJson(transactionRequest))44 }4546 startActivityForResult(transactionIntent, 1)47 }4849 override fun onActivityResult(requestCode: Int, resultCode: Int, data: Intent?) {50 super.onActivityResult(requestCode, resultCode, data)51 val paystackIntentResponse: PaystackIntentResponse5253 if (resultCode == TRANSACTION_RESULT_CODE) {54 paystackIntentResponse = gson.fromJson(55 data?.getStringExtra(TRANSACTION),56 PaystackIntentResponse::class.java57 )5859 processResponse(paystackIntentResponse)60 }61 else {62 // handle invalid result code63 }64 }6566 private fun processResponse(response: PaystackIntentResponse) {6768 val terminalResponse: TerminalResponse = response.intentResponse69 val transactionResponse = gson.fromJson(70 terminalResponse.data,71 TransactionResponse::class.java72 )7374 transactionStatus = transactionResponse.reference75 }76}
We added three functions in the MainActivity.kt class:
- makePayment: This is the function that creates the transaction request and hands it over to the Paystack app. This is what the
transactionIntentandstartActivityForResultdo. - onActivityResult: This is a callback function. When the
startActivityForResultmethod is called in themakePaymentfunction, it automatically requires this function to receive the response from the Paystack app. - processResponse: This function basically parses the result from the Paystack app and returns it back to Flutter.
Create method channel
A MethodChannel creates a communication channel between the client (UI) and the host(platform). In this case, the platform is Android. To create our MethodChannel for payment, we’ll override the configureFlutterEngine method and initiate a call to the makePayment function. We’ll add configureFlutterEngine function in the MainActivity.kt file, above the makePayment function:
- MainActivity.kt
1// other imports2import io.flutter.embedding.engine.FlutterEngine3import io.flutter.plugin.common.MethodChannel45class MainActivity: FlutterActivity() {6 private val CHANNEL = "com.example.sample_registration/payment"7 // other code snippet8 override fun configureFlutterEngine(flutterEngine: FlutterEngine) {9 super.configureFlutterEngine(flutterEngine)1011 MethodChannel(flutterEngine.dartExecutor.binaryMessenger, CHANNEL).setMethodCallHandler {12 call, result ->13 if (call.method == "makePayment") {14 val amount = call.argument("amount") ?: 015 makePayment(amount)1617 result.success(transactionStatus)18 } else {19 result.notImplemented()20 }21 }22 }2324 // other code snippet25}
The MethodChannel basically keeps a tab on the functions being called from Flutter. If it matches makePayment, it triggers the function. The full code of the MainActivity.kt is available on GitHub for your reference.
You should take note of the CHANNEL constant as we’ll be using it as an identifier in our Flutter code.
Link the method channel
We are now back in our Flutter code. We’ll be completing the MethodChannel setup by linking it to the UI. In the Widget that contains your payment button, you’ll need to add a constant to identity the channel you’re linking to and set up a function to call the makePayment function:
- Registration.dart
1static const _methodChannel =2 MethodChannel('com.example.sample_registration/payment');34Future<void> makePayment() async {5 String reference = '';6 try {7 var options = {8 'amount': 5000,9 'supplementaryData': {10 'developerSuppliedText': null,11 'developerSuppliedImageUrlPath':12 "https://assets.paystack.com/assets/img/press/Terminal-x-Bature-x-World-Cup-Receipt.jpg",13 'barcodeOrQrcodeImageText': null,14 'textImageType': null15 }16 };17 reference = await _methodChannel.invokeMethod('makePayment', options);18 print("Reference: $reference");19 } on PlatformException catch (e) {20 print("Error: $e");21 reference = '';22 }2324 setState(() {25 _transactionReference = reference;26 });27 }
The makePayment button can be called in the onPressed method of the Button Widget. You can now test that everything works as it should.
Conclusion
In this guide, we learnt how to use the Flutter’s Method Channel to communicate between Android and Flutter. We were able to use this approach to push payment to the Paystack App.
You can find the complete code on Github for reference.