Building Terminal Apps with React Native
In a nutshell
Building custom apps for Terminal with React Native? In this guide, we’ll explore how to use React Native Modules to interact with the Paystack app to accept payment.
Introduction
Before you begin
You should create a free Paystack account which will give you access to your unique test key to test your integration.
Paystack Terminal allows you to build custom apps that communicates via intent with the Terminal app to accept payments. The Terminal app handles everything about payment, allowing you to focus on building your apps. At the point of payment, you simply pass the payment details to the Terminal app via intents, the payment is processed and a response is passed back to your app.
Project setup
Getting started
This guide assumes you have an existing React Native app, hence, our focus is on building the payment flow.
We’ll be using React Native Modules to allow JS/TS to communicate with Java. This guide was guide using the following setup:
- Android Studio
- VSCode
- React (18.2.0)
- React Native (0.72.6)
While, it’s not compulsory to use all as-is, it would make it easier to follow along with little to no errors. Android Studio is particularly used to write and manage all Java code.
Create models
To get started, we’ll be creating all the models we need for the payment flow. Before creating our models, we need to install Gson, a library for serialising and deserialising Java objects.
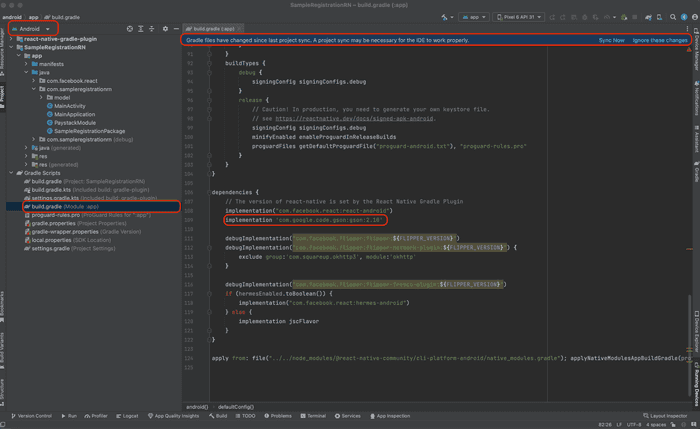
To install Gson, open the android folder in your project in Android Studio. Once opened:
- Ensure your Android Studio workspace is configured to
Android. - Open the app
build.gradle. This is the one that has aModule: YourAppName.app. - Add
gsonas a dependency. - A popup shows up to
Sync Now. Syncing installs the dependency and makes it available in your project for usage.

With our dependency installed, we can create the following models:
- TerminalResponse
- PaystackIntentResponse
- TransactionRequest
- TransactionResponse
1// TerminalResponse.java2public class TerminalResponse {3 private final String statusCode;4 private final String message;5 private final String data;67 public TerminalResponse(String statusCode, String message, String data) {8 this.statusCode = statusCode;9 this.message = message;10 this.data = data;11 }1213 public String getStatusCode() {14 return statusCode;15 }1617 public String getMessage() {18 return message;19 }2021 public String getData() {22 return data;23 }24}
Create a module
The module class holds the logic to trigger a payment request. It contains the function to initiate a payment via intents and a callback to receive the payment response. Create a module in the java → com.yourappnameand add the initial code to setup the module:
- Module Setup
1import com.facebook.react.bridge.ReactApplicationContext;2import com.facebook.react.bridge.ReactContextBaseJavaModule;34public class PaystackModule extends ReactContextBaseJavaModule {56 PaystackModule(ReactApplicationContext context) {7 super(context);8 }910 @Override11 public String getName() {12 return "PaystackModule";13 }14}
We can now flesh out the module. First, we’ll implement the callback that handles the response of the payment request:
- Module Callback
1import android.app.Activity;2import android.content.Intent;34import com.facebook.react.bridge.ActivityEventListener;5import com.facebook.react.bridge.BaseActivityEventListener;6import com.facebook.react.bridge.Callback;7import com.facebook.react.bridge.ReactApplicationContext;8import com.facebook.react.bridge.ReactContextBaseJavaModule;9import com.google.gson.Gson;1011public class PaystackModule extends ReactContextBaseJavaModule {1213 private final Gson gson = new Gson();14 private Callback mCallback;1516 private final ActivityEventListener mActivityEventListener = new BaseActivityEventListener() {17 @Override18 public void onActivityResult(Activity activity, int requestCode, int resultCode, Intent data) {19 PaystackIntentResponse paystackIntentResponse;20 TerminalResponse terminalResponse;2122 paystackIntentResponse = gson.fromJson(23 data != null ? data.getStringExtra("com.paystack.pos.TRANSACT") : null,24 PaystackIntentResponse.class);25 terminalResponse = paystackIntentResponse.getIntentResponse();26 TransactionResponse transactionResponse = gson.fromJson(27 terminalResponse.getData(),28 TransactionResponse.class);29 mCallback.invoke(transactionResponse.getReference());30 }31 };3233 // the rest of the code previously added34}
The ActivityEventListener listens to events from any Activity that returns a response to it. Multiple Activities can return a response to it, so only parse the transaction response from the Terminal app by using: data.getStringExtra("com.paystack.pos.TRANSACT"). We are also using the mCallback variable to return the transaction reference via the invoke function.
Before the ActivityEventListener can listen to events, it needs to be registered on an application level. We can register the listener in our module constructor:
- Module Registration
1PaystackModule(ReactApplicationContext context) {2 super(context);34 context.addActivityEventListener(mActivityEventListener);5}
The final part of our module is the function to initiate a payment request. This function will use the models we created in the previous section and the ActivityEventListener we just created:
- Module Make Payment
1@ReactMethod2public void makePayment(int amount, Callback callback) {3 TransactionRequest transactionRequest = new TransactionRequest();4 transactionRequest.setAmount(amount);56 Activity currentActivity = getCurrentActivity();7 mCallback = callback;89 try {10 final Intent transactionIntent = new Intent(Intent.ACTION_VIEW);11 transactionIntent.setPackage("com.paystack.pos");12 transactionIntent.putExtra("com.paystack.pos.TRANSACT",13 gson.toJson(transactionRequest));14 currentActivity.startActivityForResult(transactionIntent, 1);15 } catch (Exception e) {16 Log.d("PaystackModule", "Error: " + e.getMessage());17 }18}
In order to keep this guide simple, the makePayment function only has two parameters, amount and callback. This can be extended based on use-case.
Here’s what the complete code of the module should look like:
- Module Final
1import android.app.Activity;2import android.content.Intent;3import android.util.Log;45import com.facebook.react.bridge.ActivityEventListener;6import com.facebook.react.bridge.BaseActivityEventListener;7import com.facebook.react.bridge.Callback;8import com.facebook.react.bridge.ReactApplicationContext;9import com.facebook.react.bridge.ReactContextBaseJavaModule;10import com.facebook.react.bridge.ReactMethod;11import com.google.gson.Gson;1213public class PaystackModule extends ReactContextBaseJavaModule {1415 private final Gson gson = new Gson();16 private Callback mCallback;1718 private final ActivityEventListener mActivityEventListener = new BaseActivityEventListener() {19 @Override20 public void onActivityResult(Activity activity, int requestCode, int resultCode, Intent data) {21 PaystackIntentResponse paystackIntentResponse;22 TerminalResponse terminalResponse;2324 paystackIntentResponse = gson.fromJson(25 data != null ? data.getStringExtra("com.paystack.pos.TRANSACT") : null,26 PaystackIntentResponse.class);27 terminalResponse = paystackIntentResponse.getIntentResponse();28 TransactionResponse transactionResponse = gson.fromJson(29 terminalResponse.getData(),30 TransactionResponse.class);31 mCallback.invoke(transactionResponse.getReference());32 }33 };3435 PaystackModule(ReactApplicationContext context) {36 super(context);3738 context.addActivityEventListener(mActivityEventListener);39 }4041 @Override42 public String getName() {43 return "PaystackModule";44 }4546 @ReactMethod47 public void makePayment(int amount, Callback callback) {48 TransactionRequest transactionRequest = new TransactionRequest();49 transactionRequest.setAmount(amount);5051 Activity currentActivity = getCurrentActivity();52 mCallback = callback;5354 try {55 final Intent transactionIntent = new Intent(Intent.ACTION_VIEW);56 transactionIntent.setPackage("com.paystack.pos");57 transactionIntent.putExtra("com.paystack.pos.TRANSACT",58 gson.toJson(transactionRequest));59 currentActivity.startActivityForResult(transactionIntent, 1);60 } catch (Exception e) {61 Log.d("PaystackModule", "Error: " + e.getMessage());62 }63 }64}
Create a package
Among other things, the package class is used to register all the modules we’ve created. If a module is not registered, it cannot be available for usage. Registering our module requires creating a package and adding an instance of our module in the list of modules:
- Package
1import com.facebook.react.ReactPackage;2import com.facebook.react.bridge.NativeModule;3import com.facebook.react.bridge.ReactApplicationContext;4import com.facebook.react.uimanager.ViewManager;56import java.util.ArrayList;7import java.util.Collections;8import java.util.List;910public class SampleRegistrationPackage implements ReactPackage {1112 @Override13 public List<ViewManager> createViewManagers(ReactApplicationContext reactApplicationContext) {14 return Collections.emptyList();15 }1617 @Override18 public List<NativeModule> createNativeModules(ReactApplicationContext reactApplicationContext) {19 List<NativeModule> modules = new ArrayList<>();20 modules.add(new PaystackModule(reactApplicationContext));2122 return modules;23 }24}
Expose package
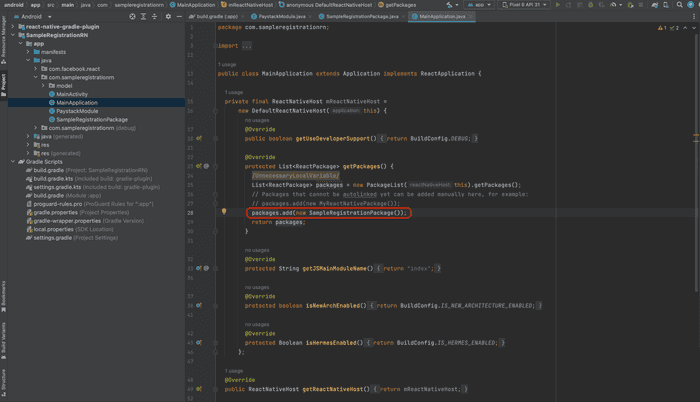
The final piece of code that needs to be exposed is the package we just created. This can be done by adding following line in the getPackages() method in the MainApplication.java class:

- Expose Package
1packages.add(new MyAppPackage());
Use module
To use our module, we need to import the Native Module and extract our module in a JS/TS file:
- Initialize Module
1import { NativeModules } from 'react-native';2const { PaystackModule } = NativeModules;
Using the module is as simple as invoking the makePayment method on our module in any JS/TS function:
- Use Module
1const onPress = async () => {2 PaystackModule.makePayment(3000, transactionReference => {3 console.log('transaction ref: ', transactionReference);4 });5};
Conclusion
In this guide, we learnt how to use the React Native Modules to communicate between Android and JavaScript. We were able to use this approach to push payment to the Paystack App.
You can find the complete code on Github for reference.